Do you want to share your screen or a file during a group video meeting? Maybe even with sound or several people at once? Eyeson presents the perfect solution for you.
Good to know
Sharing sound via screen sharing is only possible with the following browsers:
- Google Chrome
- Microsoft Edge (Chromium-based)
Also, please note that sharing your entire screen with audio is only supported by Windows. With Apple devices, you are currently restricted to sharing browser tabs if you also want to share audio.
Structure of this article:
- Screen-sharing step by step
- Full Presentation
- Split View
- Replace Self
- Picture-in-picture camera on screenshare presentation
- Sharing a browser tab with audio
- Sharing your entire screen with audio (Windows only)
- Share Content
- Ending your screen share
- Video Tutorial
Screen-sharing step by step
After you have opened your Eyeson meeting, click on Share Screen or File in the left sidebar. This will open the presentation window, where you have 3 options:
- Share screen
- Full presentation
- Split View
- Replace yourself - Share Content
- Present File

Share screen - Full Presentation
Only the shared selected screen is shown, no participants.
Share screen - Split view
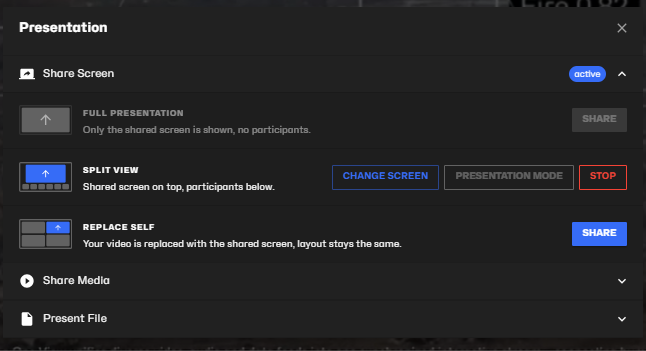
Share Screen - Replace Self
Everything else works the same as with our screen-sharing feature. The only difference is that you share your screen, not in full-screen mode, but instead of your own camera. This means that either everyone else can still be visible in the video stream with their cameras OR they can also share their screen independently from your presentation, making it possible for several participants to share their screen at the same time.
Click on the Share button. Now you can again decide between three options to share:
- your entire screen
- an application window
- a certain browser tab.
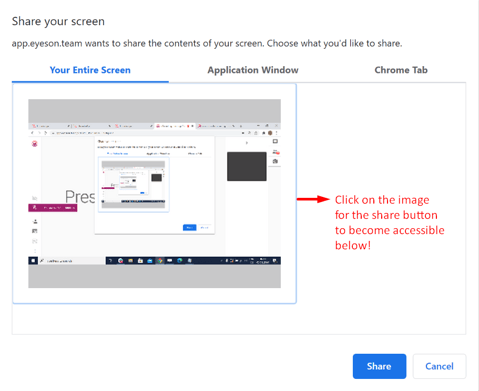
In this case, you have chosen to share your entire screen – you need to click on the picture with your screen on it in order for the Share button to appear.
Note that after you confirm the screen share, other participants will see exactly what you see on your screen. So, in case you need to open PPT or other presentation programs, this is possible to do with screen-sharing, meaning you just need to open a presentation on your computer and press "play".
If you are on a Mac using Google Chrome and have some problems, follow this link:
Problem With Screen Sharing After Update to Catalina?
Picture-in-picture camera on screenshare presentation
If you select “Full Presentation” and then choose the entire screen, a small picture-in-picture window automatically opens, showing the user’s camera with current settings (e.g., virtual background). Since the entire screen is shared, this picture-in-picture window is also part of the screen share, and so all participants will see the presenter at the same time.
The picture-in-picture window can be moved (drag-and-drop) and also resized.
There’s a new button that is only shown during a screen share presentation. It allows you to switch the picture-in-picture window on or off.
Good to know:
This feature is only available in Chrome-based browsers like Chrome, Edge, and Opera and only on Desktop (it is not available on Firefox and Safari).
If the user has more than one screen (monitor), the picture-in-picture window might be placed on another screen. It can be simply moved to the other screen.
Sharing computer sound during screen share
With Eyeson, you can present any video or MP3 file with sound. The audio quality is perfect, and if needed, you can also use your microphone at the same time.
Sharing a browser tab with audio
Let's say you want to share a YouTube video with your participants.
First, click on the Share button of your preferred layout under "Share Screen", choose a Chrome tab, select the YouTube page, and enable the checkbox "Also share tab audio" located on Chrome's screen share dialog.

Play the video. Now, everyone will watch and hear the YouTube video.

Good to know:
- The Chrome browser can also play local video or audio files. Open a new tab and drag&drop the file on it, or choose “Open File…” from the menu and you’re ready to present the tab including audio.
- You can also play sound from the slides of your presentation if you are using web applications like Google Slides or others. It is possible to upload PowerPoint presentations to your OneDrive and open them using the PPT web application. (If you are using a Microsoft device, you can simply share your entire screen and open the PPT locally as explained below).
- Screen sharing with audio is currently only supported in Chrome and the new Chromium-based Microsoft Edge. Please check availability in other browsers.
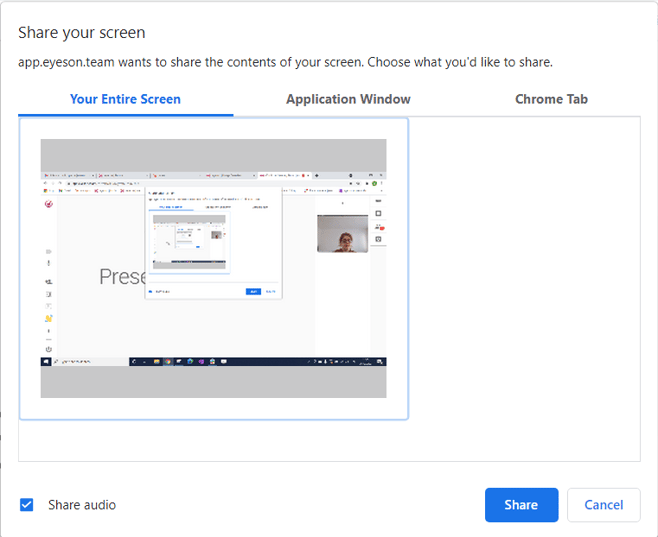
Sharing your entire screen with audio (Windows only)
On Windows, screen sharing with audio is not only available for browser tabs but also for the entire screen. No matter which program or file is open on your screen and what you present, you can share sound, too!
How does it work?
Sharing your screen with audio works the same way as sharing it without audio (explained above). First, click on the Share your screen button and choose the screen you want to share. Don't forget to enable the "Share Audio"-checkbox in the lower left corner.
Now, simply open any program you need for your presentation on your computer. That's it!
This way, you can play videos directly in your preferred local video player (e.g. Windows Media Player, VLC Player, etc.) or present your slides using your local applications (e.g. PowerPoint). Basically, you can use any program you want and even show browser tabs, including audio, too.
If you use more than one screen, just be sure to show the programs on the screen you selected for the screen sharing.
Share Media
There are 3 options: Share Second Camera, Share YouTube Video and Play Tab Audio.

- Share Second Camera
- Share YouTube Video
You can share a YouTube video by entering the URL. The player will appear in a separate popup. More information can be found here.
- Play Tab Audio
You can add background music to your meeting using the Play Tab Audio feature.
Numerous music applications, such as YouTube Music and Spotify, offer also web players, and so you can play the music by selecting those tabs.
Good to know: it only works with Chromium-based browsers (Chrome, Edge, Opera)
Ending a presentation
Screen sharing can be immediately stopped by clicking Stop in the Presentation window or via the browser insert.
Need Support?
Should you have any comments, suggestions or questions, please do not hesitate to contact support@eyeson.com!